前言
记录一些小知识点、工具、文章收藏
01. 链接收藏
其他:
非技术:
| 地址 | ||
|---|---|---|
| 酷壳:别让自己“墙”了自己 | ||
云服务器:
阿里云 ECS 99/年,活动期内(活动时间: 2023年10月31日0点0分0秒至2026年3月31日23点59分59秒。)续费同价,新老用户同享:https://www.aliyun.com/lowcode/promotion/allinaliyun/99program
阿里云在校学生300无门券/合作高校3折券领取:https://university.aliyun.com/
02. sshpass 非交互登录
ssh 不能在命令行中指定密码
sshpass:
用于非交互的 ssh 密码验证,允许用 -p 参数指定明文密码
支持密码从命令行,文件,环境变量中读取
Ubuntu 报错
E: Unable to locate package sshpass
apt-get update; sudo apt-get install sshpass
登录脚本(第一次需 SSH 登录)
1 | $ cat ali.sh |
-o option => Can be used to give options in the format used in the configuration file.
ServerAliveinterval=60client每隔60秒发送一次请求给server,然后server响应,从而保持连接(防止连接空闲超时)
定义别名 alias
1 | $ cat ~/.bashrc |
参考文章:
03. Xftp 显示隐藏文件

参考文章:Xftp显示隐藏文件的方法
04. Github 多账户 SSH 配置
- -b:指定 key 的 bit 数,对于 RSA key 而言,默认是 3072 bits
- -f:指定 key 的文件名,若需要指定路径,则文件名需要和路径一直,如 ~/.ssh/id_rsa_gh
- -C:指定新的 comment,即公钥末尾的字符串,一般是邮箱地址,若不指定会是 “username@hostname” 的形式
- -t:指定私钥类型,一般有 “dsa”, “ecdsa”, “ecdsa-sk”, “ed25519”, “ed25519-sk” 和 “rsa” 等几种,若指定为 rsa 还可以指定签名类型,默认为 “rsa-sha2-512”
Github 不同账户,类似配置
2
3
4
5
6
7
8
9
10
11
12
13
14
15
16
17
18
19
20
21
22
23
24
25
Host github.com
HostName github.com
PreferredAuthentications publickey
IdentityFile ~/.ssh/user1_rsa
User user1
Host github.com
HostName github.com
PreferredAuthentications publickey
IdentityFile ~/.ssh/user2_rsa
User user2
------
Host user_gh.github.com
HostName github.com
User user_gh
IdentityFile ~/.ssh/id_rsa_gh
Host github-qileq.com
HostName github.com
User qileq
IdentityFile ~/.ssh/id_rsa_qileq
Host gitlab.com
HostName gitlab.com
User user_gl
IdentityFile ~/.ssh/id_rsa_gl
Host 类型昵称,可以简化登录的输入地址,比如
Host ccl,则可以用ssh ccl直接连接HostName 表示连接的远程主机地址
IdentityFile 表示指定私钥文件路径
Port 指定端口
User 指定用户名
修改仓库的 git 信息,将仓库配置 url 的 http://github.com 替换为 ssh config 中设置的 Host 值。
笔者以 java-roam-guide 为例,使用如下两种方式来修改仓库地址:
执行命令 git remote set-url origin git@github-qileq.com:qileq/java-roam-guid.git
将该仓库 .git/config 中的 url = git@github.com:qileq/java-roam-guide.git 修改为 url = git@github-qileq.com:qileq/java-roam-guide.git
修改完成后,执行 git remote -v 查看仓库地址是否正确。
2
3
4
5
6
7
8
9
10
11
12
13
14
15
# 配置用户1
Host user1.github.com # 别名,可以随便写一个url。
Hostname github.com # 网站真实的域名,如果是GitHub就不用改了
PreferredAuthentications publickey
IdentityFile ~/.ssh/id_rsa_user1 # 指向user1的私钥路径,似乎只能在~/.ssh下,不要随便放
User user1 # 填写user1的Github用户名,不过似乎最后获取的还是真实的Github用户名
# 配置用户2
Host user1.github.com
Hostname github.com
PreferredAuthentications publickey
IdentityFile ~/.ssh/id_rsa_user2 # 指向user2的私钥路径,似乎只能在~/.ssh下,不要随便放
User user2 # 填写user2的GitHub用户名,不过似乎最后获取的还是真实的Github用户名如果是直接使用
git@github.com,那么ssh将自动识别为config列表的第一个用户,可以认为是单用户模式由于是多用户,所以在第一次clone一个GitHub地址的时候,需要简单的修改一下对应的域名,此时SSH将可以识别使用哪个用户进行操作,并建立配置记录
2
3
4
5
6
git clone git@github.com:oneflyingfish/WebServer_C.git
# 对应修改一下<github.com>,user1修改为上面配置的<user1.github.com>即可
git clone git@user1.github.com:oneflyingfish/WebServer_C.git多用户共用情况下,如果提示设置用户名,一定要设置为
局部信息,而不是global。命令应修改为
2
3
4
5
6
7
8
git config --global user.name "your_name"
git config --global user.email "your_eamil"
# 我们应该使用的命令
git config user.name "your_name"
git config user.email "your_eamil"
参考文章:
05. APICloud 打包网页
未成功
APICloud => Web App 创建
图标 https://cdn.iocdn.cc/npm/mycpen-image-bed@0.0.0-2023/image/202304061700919.png
启动页 https://cdn.iocdn.cc/npm/mycpen-image-bed@0.0.0-2023/image/202304061700867.png

安装后的 APP 因无法开启存储空间权限,未能成功(个人原因,Fomalhaut🥝 的 APP 能设置)
参考教程:将网站 / 博客打包成桌面 APP、Fomalhaut🥝.留言
06. Hexo 渲染脚注
下文采用 hexo-renderer-markdown-it 渲染器(渲染脚注效果一般,不打算用脚注了)
尽管标准 Markdown 不支持脚注,但很多 Markdown 变种都支持。一般来说,大多数 Markdown 方言和编辑器支持行内脚注和引用式脚注这两种方式,而后者使用更为普遍(原文:在 Markdown 中使用引用式链接和脚注)
2
npm install --save hexo-renderer-markdown-it
2
3
plugins:
- markdown-it-footnote原文:我的博客的诞生(二)
2
3
4
5
6
7
8
[^1]: Here is the footnote.
[^longnote]: Here's one with multiple blocks.
Subsequent paragraphs are indented to show that they
belong to the previous footnote.
2
3
you don't have to pick an identifier and move down to type the
note.]
个人配置:
1 | # https://butterfly.js.org/posts/ceeb73f/#Math-%E6%95%B8%E5%AD%B8 |
参考文章:
07. Base64 加密邮箱 解密
加密的邮箱地址,使用 base64 加密。在线加密:https://encode.chahuo.com/
解密 javascript:decryptEmail(...),代码示例:https://www.mycpen.cn/
1 | <a href="javascript:decryptEmail('bXljcGVuQHFxLmNvbQ==');" title="email"></a> |
08. Word 转 MD(Pandoc)
1 | pandoc -xxx.docx -o xxx.md |
一、下载pandoc
建议使用msi直接安装,而不是下载安装包直接使用,msi的下载方法:安装方法。二、pandoc转换
1、cmd进入文件夹
打开cmd。
转换到文件所在的路径中。d:进入D盘的路径下,CD D:\Program Files\OneDrive\桌面\temp2、代码实现

参考文章:word文件转md文件
09. GitHub 删除历史记录
1 | git reset <上一步复制到的字符串> |
参考文章:GITHUB删除历史记录
10. ChatGPT API Key 个人站
项目地址:
参考文章:
11. 字符画 consolo.log()
推荐:http://patorjk.com/software/taag
文字生成字符画:
http://patorjk.com/software/taag
http://www.network-science.de/ascii/
图片生成字符画:
http://www.degraeve.com/img2txt.php
http://life.chacuo.net/convertphoto2char
流程图生成字符画:
http://asciiflow.com/
VSCode 插件:
https://github.com/OBKoro1/koro1FileHeader
参考:https://blog.saop.cc/p/c9df/
12. ERR_HTTP2_PROTOCOL_ERROR 关闭 HSTS
访问网站,偶然性报错:ERR_HTTP2_PROTOCOL_ERROR。试着关闭 HSTS
CDN HTTPS 配置 关闭 HSTS,多吉云个人链接

以下内容来自 ChatGPT:
问:
ERR_HTTP2_PROTOCOL_ERROR 和 HSTS 有什么联系问:
HSTS 会导致 ERR_HTTP2_PROTOCOL_ERROR 报错吗


13. Clash Parsers
设置 => 配置 => 配置文件预处理
1 | parsers: # array |
参考链接:
14. Replit 部署 Typecho.TimePlus
步骤:https://github.com/zhheo/TimePlus/wiki/
在 Typecho 后台导航栏点击【撰写】,在自定义字段中填写图片地址。并填写文章标题和内容,即对应为图片的标题和简介。
搭建步骤:
Replit Create a Repl,环境选 SQLite;参照 @valetzx/typechonreplit 执行
git clone https://github.com/valetzx/typechonreplit && mv -b typechonreplit/* ./ && mv -b typechonreplit/.[^.]* ./ && rm -rf *~ && rm -rf typechonreplit;注释main.shbutterfly 相关行,bash main.sh;Run 运行;设置 Typecho 时选择 SQLite 数据库按照 TimePlus.Wiki 设置,将 Source code 解压上传 Replit Repl 对应路径,按步骤设置
图片仓库批量获取图片 URL
ls ./bj |awk '{print "https://mycpen.gitee.io/cdn2/image/bj/"$1""}' > C:/Users/Administrator/Desktop/TimePlus.txtReplit Repl 绑自定义域名,需先 TXT 记录认证(因验证问题无法使用 https)
相关链接:
15. Git 修改提交信息
2023-12-13 更新
使用 git rebase -i HEAD~<n> 修改最近某一次的提交信息,以下来自 chatgpt
当您执行
git rebase -i HEAD~<n>命令时,会打开一个交互式的编辑器界面,列出最近<n>个提交。下面是一个示例,假设您要修改最近的前三次提交的提交信息:
2
3
pick 5d6e7f8 Commit message 2
pick 9g0h1i2 Commit message 3要修改提交信息,将每个提交的行的开头的
pick改为reword或r,然后保存并关闭编辑器。修改后的示例如下:
2
3
reword 5d6e7f8 Commit message 2
reword 9g0h1i2 Commit message 3保存并关闭编辑器后,Git 会逐个应用这些提交,并在每个提交之前暂停并等待您编辑提交信息。对于每个提交,Git 会打开一个新的编辑器窗口,允许您修改提交信息。完成修改后,保存并关闭编辑器。
请注意,如果在 rebase 过程中出现冲突,您需要解决冲突并使用
git add命令将解决后的文件标记为已解决。然后,继续进行 rebase,直到所有提交都被处理完毕。完成 rebase 后,您可以使用
git log命令验证提交信息是否已成功修改。
如果要将修改的提交信息推送到远程仓库,您需要使用
git push --force命令,因为您已经修改了历史提交。
请确保在进行此操作之前备份您的代码,并与团队成员进行沟通,以免影响其他人的工作。
2
3
git push --force <remote-name> <branch-name>

2
3
4
git commit --amend -m "新的提交信息"
git push --force origin master

16. GitHub: BiliBiliToolPro
2024-12-11 更新至最新版本 V2.1.1
版本 2.1.1,上线时间 2024-05-13
地址:github
失效项:
1 | $ pwd |
1 | $ crontab -l |
地址:https://github.com/RayWangQvQ/BiliBiliToolPro
本地部署:
1 | $ pwd |
1 | $ crontab -l |
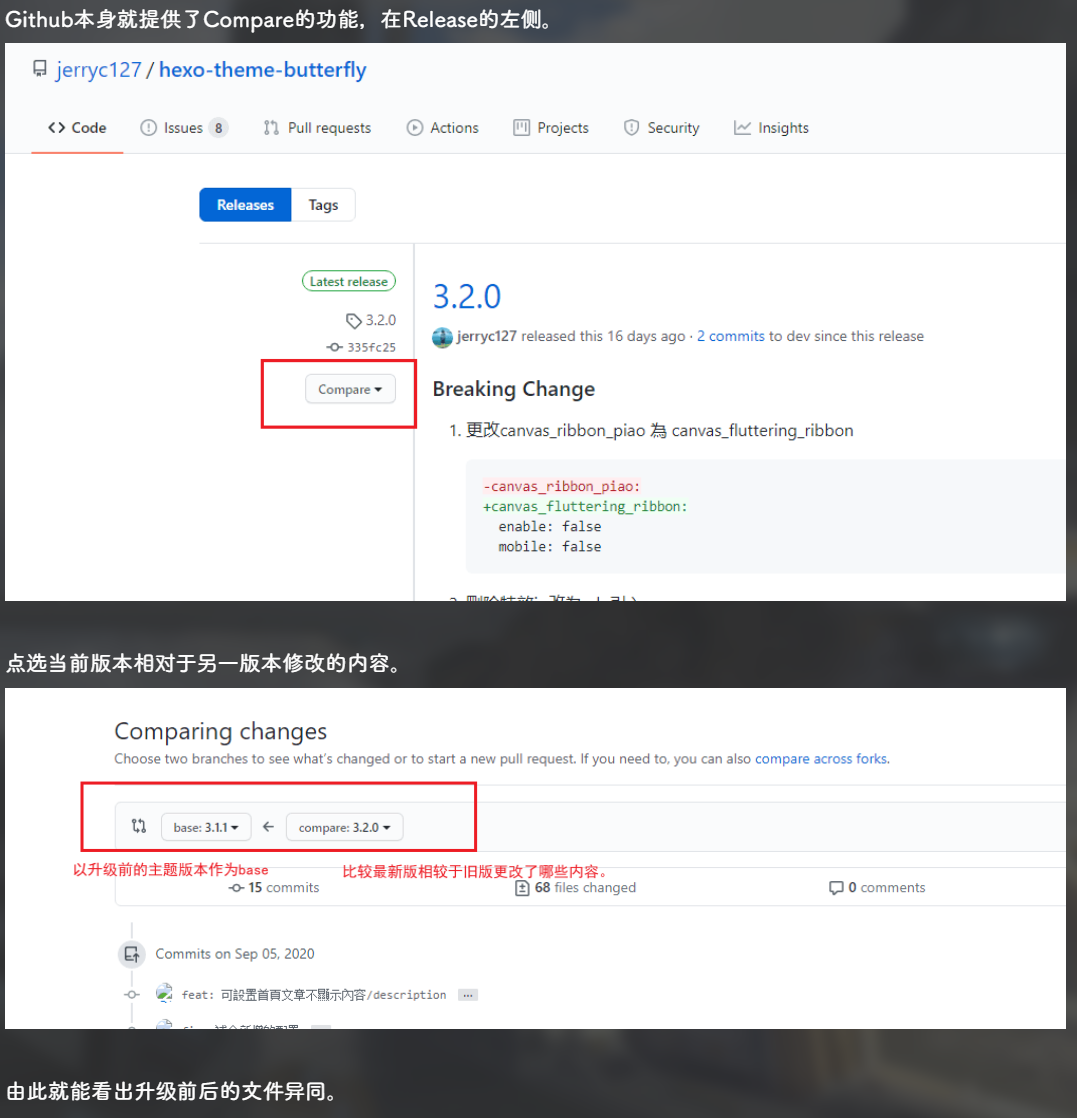
17. GitHub Compare
原文:https://akilar.top/posts/bbf68ad4/
示例:https://github.com/jerryc127/hexo-theme-butterfly/compare/4.8.5...4.9.0
18. new Date().getFullYear();
JavaScript 获取当前年份
1 | // 要以自动方式获取明年的年份并将其用于创建日期对象,您可以按如下方式修改代码: |
19. JavaScript 解码 Base64
在线加密:https://encode.chahuo.com/
以下来自 ChatGPT
在 JavaScript 中解码 Base64 编码的数据,你可以使用
atob()函数。该函数可以将 Base64 编码的字符串解码为原始的文本数据。示例代码如下:
2
3
const decodedString = atob(base64String); // 解码
console.log(decodedString); // 输出解码后的字符串在这个例子中,
base64String你要解码Base64编码的字符串。使用atob()函数对它进行解码,然后你就可以处理解码后的原始字符串了。
20. JavaScript 取绝对值
来自 ChatGPT
在 JavaScript 中,你可以使用
Math.abs()函数来获取一个数的绝对值,从而去除负号。例如:
2
let absNum = Math.abs(num); // absNum将是5这样,
absNum将会取得num的绝对值,而不考虑其正负。
21. JavaScript 三元运算
来自 ChatGPT
你可以使用条件运算符(三元运算符)来判断
e - now1是否大于 0,然后决定是否执行 +1。下面是优化后的代码:
这行代码首先计算
(e - now1) / 1e3 / 60 / 60 / 24得到天数差,然后根据(e - now1 > 0)条件判断天数差是否大于 0,如果是则加 1,否则加 0。最后使用Math.floor向下取整。
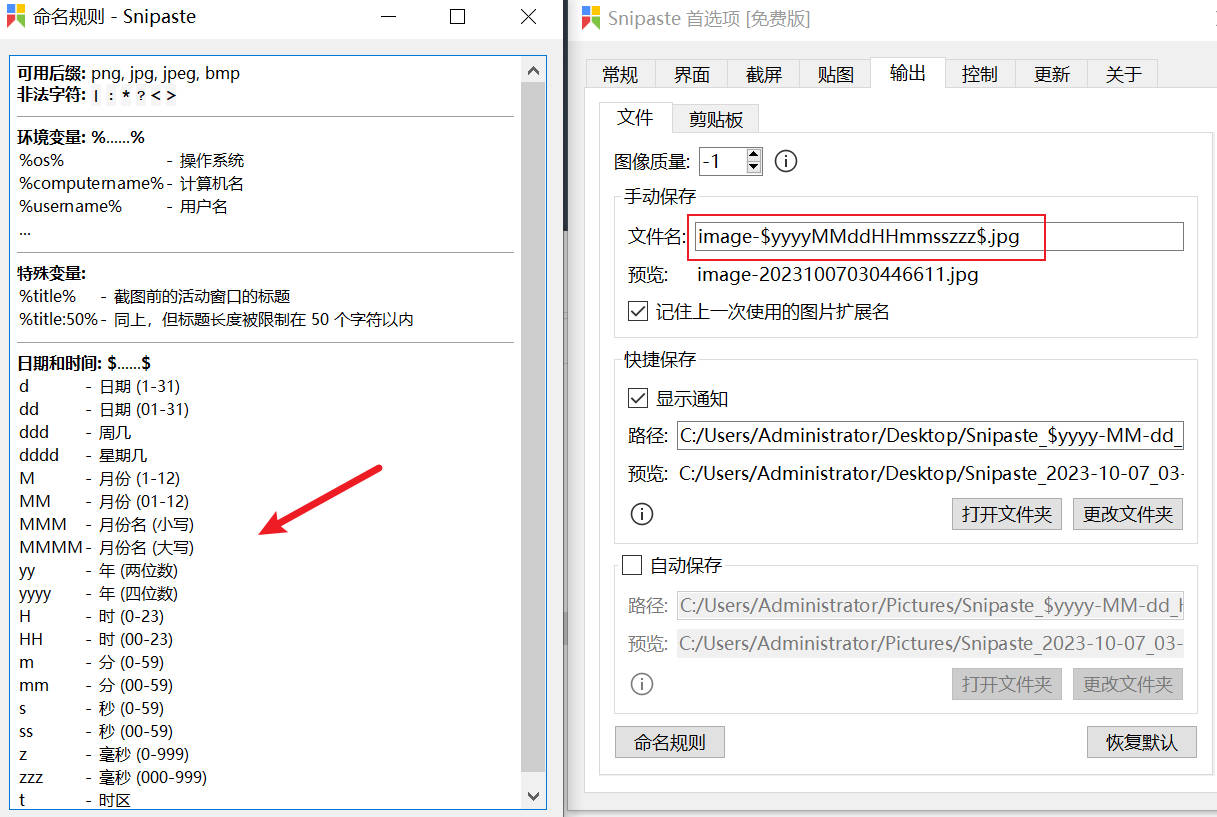
22. Snipaste 截图格式改 JPG
参考:https://jingyan.baidu.com/article/25648fc14b3276d091fd00c3.html
右键 → 首选项 → 输出 → 文件名.后缀
实测大大减少图片体积,500 KB (PNG) → 70KB (JPG)
仅适用于保存为本地文件,从剪贴板中粘贴到 typora 里还是 PNG 格式的
本人格式:image-$yyyyMMddHHmmsszzz$.jpg,目的 与 typora 剪贴板 上场时的 alt 命名保持一致
23. CSS 视口单位 dvh, svh, lvh
参考:
24. CSS 旋转 rotate(90deg)
来自 ChatGPT
rotate(90deg)是CSS中的旋转变换指令,用于将元素顺时针旋转90度。这可以应用于任何HTML元素,使其在页面上以指定角度旋转。逆时针旋转一个元素90度,
rotate(-90deg)
2
3
transform: rotate(-90deg);
}
25. Markdown 折叠语法
参考:https://blog.csdn.net/ybb_ymm/article/details/128508243
1 | <details> |
1 | <details> |
26. PicGo 图片压缩插件
插件名:picgo-plugin-compress-tinypng
NPM 包:picgo-plugin-tinypng
TinyPNG
Key 限额 500 次/月:https://tinify.cn/dashboard/api

起因:picgo-plugin-compress 长久失修,picgo 2.3.1 报错 TypeError: req.end is not a function。 issue#64 获知此插件
27. JavaScript copy 事件
来自 ChatGPT
要检测用户是否复制内容,你可以使用JavaScript中的copy事件来捕获复制操作。你可以将事件监听器绑定到copy事件上,然后在该事件触发时执行相应的操作,以获知用户是否复制了内容。
1 | document.addEventListener('copy', function(event) { |
1 | document.addEventListener('copy', function(event) { |
28. JavaScript window.onresize
来自:ChatGPT
window.onresize 是 JavaScript 中的一个事件处理属性,它用于指定在浏览器窗口大小改变时要执行的函数。当用户调整浏览器窗口的大小时,就会触发 resize 事件,如果你将一个函数分配给 window.onresize,那么这个函数将在窗口大小改变时被调用。
例如,你可以使用以下方式监听窗口大小改变事件并执行相应的操作:
1 | window.onresize = function() { |
这对于创建响应式设计或根据窗口大小进行布局调整等任务非常有用。当窗口大小发生变化时,你可以根据需要更新页面内容、样式或执行其他自定义操作。
29. Git 指定远端
参考:http://www.mobiletrain.org/about/BBS/161969.html
1 | git remote add origin <远程仓库URL> |
30. Git 删除文件历史提交记录
参考:ChatGPT
1 | git filter-branch --force --index-filter 'git rm -r --cached --ignore-unmatch node_modules' --prune-empty --tag-name-filter cat -- --all |
ChatGPT 还提供了 git filter-branch --tree-filter 'rm -rf node_modules' --prune-empty HEAD 命令删除,运行时间过长,不采用,给出的解释:命令1 使用了 --index-filter 和 --cached,这些参数可以更快地处理 Git 的索引而不需要检查和修改实际的工作树文件
git filter-branch --tree-filter 'rm -rf node_modules' --prune-empty HEAD:
- 使用
--tree-filter参数,它会在每个提交上执行指定的 shell 命令。在这种情况下,它会执行rm -rf node_modules命令来删除node_modules目录。- 使用
--prune-empty选项以删除空提交。- 只作用于当前分支
HEAD。
git filter-branch --force --index-filter 'git rm -r --cached --ignore-unmatch node_modules' --prune-empty --tag-name-filter cat -- --all:
- 使用
--index-filter参数,它会在 Git 索引上执行指定的命令。在这种情况下,它会执行git rm -r --cached --ignore-unmatch node_modules命令,以将node_modules从索引中删除。- 使用
--prune-empty选项以删除空提交。- 使用
--tag-name-filter cat选项,以保留提交的标签(tags)。- 使用
--all来指定作用于所有分支。之前上传 github 时提交了无需提交的 node_modules,如何缩小 .git 的大小
ChatGPT:要缩小.git目录的大小,可以采取以下步骤:
清理历史提交中的node_modules:首先,你需要清理历史提交中的不必要的node_modules目录。你可以使用
git filter-branch命令或git filter-repo工具来重写历史提交以删除node_modules。确保在删除之前备份你的仓库,以防发生问题。使用.gitignore:在项目根目录下创建一个名为
.gitignore的文件,并将node_modules/添加到其中,以确保不再将该目录包括在提交中。执行
git rm --cached node_modules -r:这将删除当前暂存区中的node_modules目录,但不会删除物理文件。然后,提交这一变更。执行
git reflog expire --expire=now --all:这将清理Git的reflog,以确保不再保留对不必要历史提交的引用。执行
git gc --prune=now:这将触发垃圾收集,清理不必要的数据,从而缩小.git目录的大小。推送到远程仓库:如果你使用远程仓库(如GitHub),确保将这些更改推送到远程仓库以同步它们。
请注意,这些步骤会修改你的Git历史,因此在执行它们之前务必小心,确保已备份你的仓库数据。
31. 洛雪音乐导入三方音源
官方源因 TX 警告而报废,详见 issue:https://github.com/lyswhut/lx-music-desktop/issues/1643
详见 issue:https://github.com/lyswhut/lx-music-desktop/issues/1649#issuecomment-1774536022
仓库:https://github.com/OneCodeMonkey/music-sources
32. Clash GUI
起因:Clash for Windows 删库
Clash Verge:https://github.com/zzzgydi/clash-verge/
Clash for Android 存档:https://github.com/Z-Siqi/Clash-for-Windows_Chinese/releases/tag/CFA
Clash for Windows 存档:https://github.com/Z-Siqi/Clash-for-Windows_Chinese
33. GitHub SSH 超时
git pull 报超时、ping github.com 报超时
解决方案
1 | # git bash 终端 |
内容如下,第一次 git pull 时输入 yes
1 | # GitHub Start |
参考
github About GitHub’s IP addresses
34. Hexo 隐藏文章
Front-Matter配置published参数1
2
3
4
title: Foo
published: false存为草稿
1
2# 路径 source/_drafts/
hexo new draft <title>插件,hexo-hide-posts 等
官方参考
35. GitHub 2FA
GitHub 2FA 双因素认证
地址:https://github.com/settings/security
Chrome插件:Authenticator
参考:https://zhuanlan.zhihu.com/p/657035724
36. GitHub: B 站粉丝牌助手
用途:b站粉丝牌升级
版本:fdc626f,commits;Nov 11, 2024
地址:https://github.com/XiaoMiku01/fansMedalHelper
文档:https://xiaomiku01.github.io/fansMedalHelperVersion/
服务器部署:https://xiaomiku01.github.io/fansMedalHelperVersion/guide/location.html
1 | $ pwd |
1 | $ cp users.example.yaml users.yaml |
使用 B站access_key获取工具 管理员身份运行,获取 access_key
文件 users.yaml 修改项:access_key、SIGNINGROUP: 2
1 | # cat users.yaml |
使用计划任务每日一点跑程序,参考自 文档
1 | $ crontab -l |
37. 音乐播放器
酷我音乐PC:蓝奏云
38. b站 硬核会员
b站 硬核会员答题 油猴脚本
参考
安装
安装Tampermonkey(建议)或其他脚本管理器;
点此安装搜题脚本。
使用
手机哔哩哔哩客户端进入答题;
浏览器登录哔哩哔哩(已登录可跳过此步骤);
浏览器打开调试工具(
F12), 将浏览器切换为移动设备(Ctrl+Shift+M);在地址栏输入
https://www.bilibili.com/h5/senior-newbie/并回车,进入答题,等待网页加载完成;启动脚本(
Alt+N);- 加载题库(需要题目完全匹配):可从本地加载题库(支持
txt,doc,docx,xls,xlsx格式),题库中搜索不到则使用搜索引擎搜索 - 直接运行:使用搜索引擎搜索(支持
百度,搜狗,必应,谷歌)
- 加载题库(需要题目完全匹配):可从本地加载题库(支持
点击题目即可进行搜索。
注意事项
使用此脚本时建议关闭其他插件/脚本,避免冲突;
建议选择
文史,知识,音乐等答案比较好搜索判断的类型。
39. npm cdn
参考
40. CentOS 配置 zsh
背景:2025/5/11 更换新云主机 CentOS Stream 9,迁移旧主机配置
参考
别名免密登录:mycpen
修改主机名
1 | $ cat /etc/hostname |
安装 zsh 和 oh-my-zsh,参考 博客园
查看当前 shell
echo $SHELL安装 zsh
yum install -y zsh查看系统中已经安装的 shell
cat /etc/shells切换 shell
chsh -s /bin/zsh安装 git
yum install -y git安装 oh-my-zsh
1 | sh -c "$(curl -fsSL https://raw.githubusercontent.com/robbyrussell/oh-my-zsh/master/tools/install.sh)" |
修改 oh-my-zsh 主题
1 | $ vim ~/.zshrc |
其他配置
迁移计划任务 crontab 定时脚本 crontab -e
1 | # ================================================ |
BiliBiliToolPro
参考
本地部署:2025/5/11,V2.2.1 2025/5/23,V3.1.0,参考:github-linux
1 | $ pwd |
fansMedalHelper
参考
本地部署:2025/5/11,fdc626f Nov 11, 2024,参考:文档
1 | $ pwd |
1 | $ cp users.example.yaml users.yaml |
使用 B站access_key获取工具 管理员身份运行,获取 access_key
文件 users.yaml 修改项:access_key、SIGNINGROUP: 2
1 | # cat users.yaml |
使用计划任务每日一点跑程序,参考自 文档
1 | $ crontab -l |